
To install MCAS-S:
- Download the latest version MCAS-S installer from the MCAS-S download page.
- Double-click the MCAS installer and follow the installation instructions. Install the software on a local hard drive. The default location is C:\Program Files\ABARES\Multi-Criteria Analysis Shell vX.
- The MCAS-S icon should have been added to the desktop showing that the installation has been successful.
- Double click the MCAS-S icon to open the software.
In order to follow along with this tutorial, you will need to additionally download the quick start project template, which includes all the data required for this guide.
Opening the guide project
After downloading the quick start project template, un-zip the file into a local directory of your choosing.
There are two ways to open an existing project:
- Navigate to the directory where you un-zipped the download file and select the project filename, Sample Project (.mcas filetype), using windows explorer or similar. Double click to open the project,
or
- Open MCAS-S using the desktop icon. MCAS-S will start and the screen shown in figure 2 will appear. Go to the File drop-down menu, select Open, navigate to the project and double click on Sample Project (.mcas filetype)
The Interface
MCAS-S features a simple user interface. To use a tool, click and drag the tooltip onto the workspace. The basic functions of the different tools can be seen in the figure below:

When selecting a map layer, the corresponding classification information will be displayed in a panel on the left side of the window.
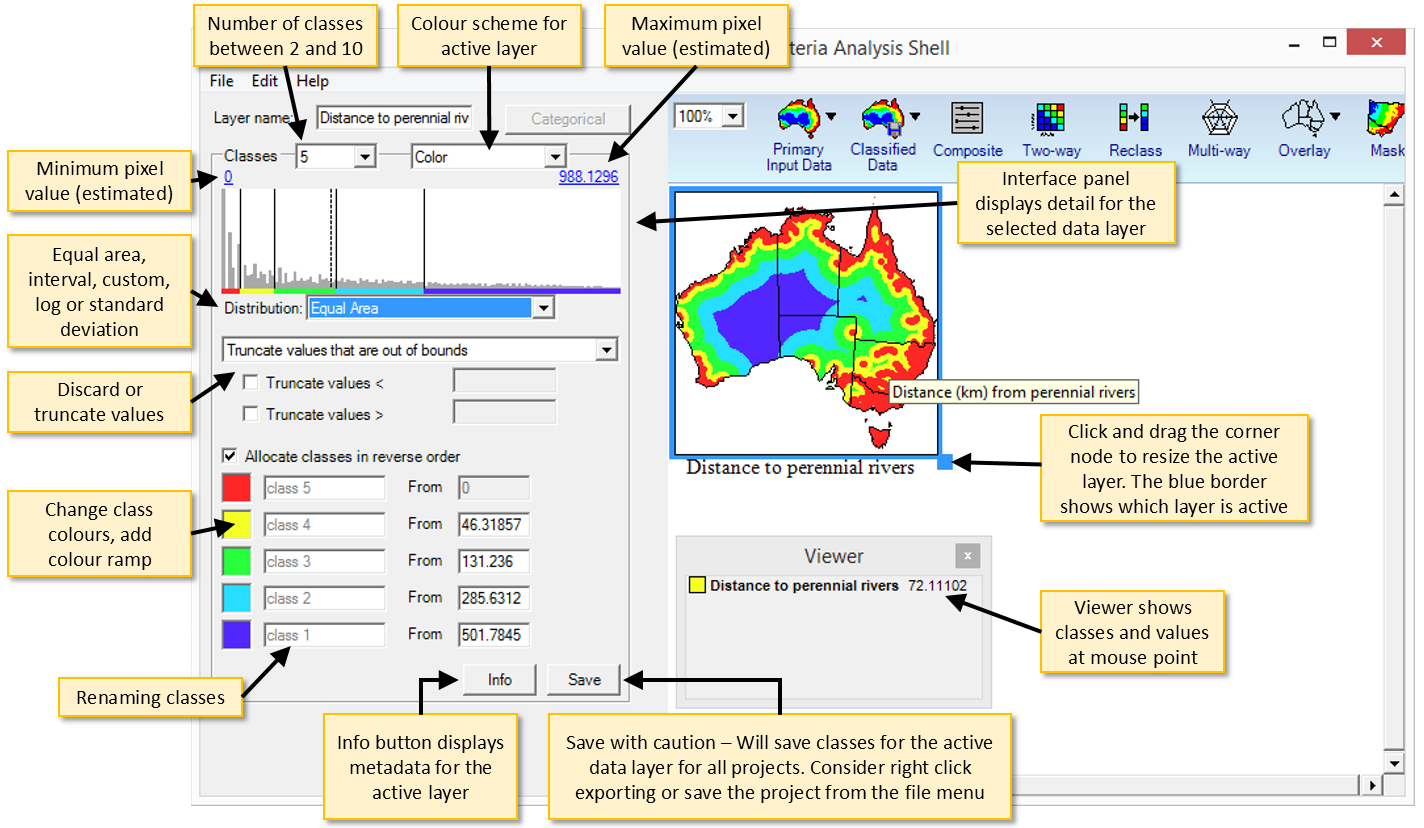
Overlays can be selected for display over map data. Select an overlay from the drop down menu to display it over all maps on the workspace.
Similarly, masks can be selected from the mask drop down menu. Multiple masks can be selected by holding shift when left clicking on multiple masks in the drop-down menu.
Keyboard Shortcuts
- Zoom In ---------------------- Ctrl + Left click
- Zoom out -------------------- Ctrl + Shift + Left click
- Select multiple maps ----- Hold Shift + Left click
- New Project ----------------- Ctrl + N
- Open Project ---------------- Ctrl + O
- Save Project ---------------- Ctrl + S
- Print --------------------------- Ctrl + P
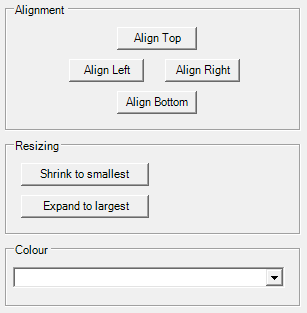
Aligning layers
To align maps, select multiple maps by holding shift and left clicking each map. Map alignment options will appear in the leftmost display panel. Clicking on the "Align Left" will align all selected maps to the leftmost map, "Align right" will do the same for the rightmost map and so on for the "Align Top" and "Align Bottom" options.
Underlays
To use an existing map as an underlay for all maps on the workspace, right-click the map and select Use as underlay. The opacity of the undelay can be adjusted using the horizontal slider which will appear in the bottom right of the workspace when an underlay is active. To remove the underlay, press the 'X' button found on the opacity slider panel.

← Previous Section: Introduction | Next Section: Input and Classification →